Our Wedding Day: Make up and Hair

I blinked and it’s Friday which means somehow it’s already time for the fourth in my series of blogs dedicated to all the finer details of our wedding day, so far we’ve covered the dress, accessories, bridesmaids and today it only felt right to dedicate an entire post to a subject very close to my heart- MAKE UP!…..oh and hair!
Read on to hear what inspired me when choosing my bridal hair and make up look and for a full list of products I couldn’t live without on my big day.

A huge part of my job is working with brides to envisage and “design” if you like their bridal make up look. I love hearing all about the day they have planned, their vision not only for themselves but for the entirety of the day, seeing photos of their glorious dresses and chatting about what they love and perhaps don’t so much in make up on themselves. It is then, with all of this knowledge that I begin to feel inspired and can confidently create a bridal make up look I know they’ll love. With all of this in mind I never doubted I would struggle when the time came to decide on my own desired make up look for the day and yet as I often hear from my brides, my mind became a blank, over saturated and confused Pinterest jumble and I had no idea.
During the time leading up to the wedding day I used girls nights out and special occasions to play with my make up looks. I played with winged liner looks, minimal make up, intense smokey eyes and even stretched far from my comfort zone of a permanent nude lip and played with a rich, berry toned lip shades. Hilariously and totally as expected I eventually came full circle and decided, much as I always recommend to my own brides, I wanted to simply look a better version of myself and so my make up look wasn’t worlds away from my everyday make up, just dialed up a notch and with a full set of fluttery lashes.

So what did I use? As any make up artist or junkie would, despite opting for a fairly simple make up look I had a make up bag full to the brim of products.
So here goes!
For my base I used a combo of two products. I am not usually a wearer of foundation, I by no means have perfect skin but have always opted for tinted moisturisers and BB creams for both my day or night make up. I like fresh, luminous skin but also admittedly these moisturising formulas are easier to blend than a fuller coverage foundation and suit my rather manic lifestyle of applying make up most days before the sun has set.
I used the IT Cosmetics Your Skin But Better CC+ Cream Illumination, £30. This incredibly luminous, cream like product packs a pretty good punch coverage wise while still leaving skin looking fresh. I tested this product vigorously under flash photography to confirm that despite it’s high SPF it created zero flashback. I applied this well buffed on the day to all areas of the face avoiding only the under eye and central parts such as the nose, forehead and chin.
To combat shine and feeling conscious that although the CC+ cream felt enough alone, it would of course be a very long day I applied a long wearing, full coverage foundation. My choice was the Tom Ford Waterproof Foundation, £66. This product is hella pricey but it really does not budge. It gives you intense coverage, waterproof, bullet proof make up without any of the cake or visibility that a lot of these foundations fall down on.
This combo was incredible! My base lasted all day, with zero touch ups or re powdering (unheard of for me!) and looked as good last thing at night as it had when first applied.
I didn’t need any more coverage in the way of concealer on my face because of this great combo and the skin gods for once being kind and not planting any corker spots that would need additional assistance however after a stressful week in the build up and very little sleep I needed help big time in the under eye department.
I firstly used the Becca Under Eye Brightening Corrector in Light to Medium, £21. This funny, pinky cream looks bizarre but works like a dream to counteract and cancel out any blueness underneath the eyes. I applied a very thin layer and voila, I actually looked like I was quite well rested!
For extra bright, perky eyes I then layered a regular under eye concealer over the top. I used the IT Cosmetics Bye Bye Under Eye Concealer, £23.50. This concealer has been a firm favourite in my kit for a while now, its stiff cream like texture provides heaps of coverage while it’s elastic texture means it moves with the face avoiding any creasing or cracking with wear. Plus it’s waterproof so I didn’t need to worry about re-apply even after any potential tears.

With the base done, I began to add some colour back into my face starting by carving some much needed cheekbones. To do so I used my trusty pal and kit favourite the Charlotte Tilbury Contour Wand, £29. This liquid contour can quite literally be sponged onto skin and blends like a dream making it in my eyes the easiest and quickest way to define cheekbones. I applied liberally and then buffed over my usual MAC ‘Matte Bronze’ Bronzing Powder, £23.50 to add warmth and soften any hard edges from the contour at the same time.
I used two shades of blusher to give the most realistic look of a natural blush, we don’t after all blush in just one tone and despite feeling nervous and no doubt flushing while walking down the aisle, with such a full coverage base on I was at no risk of that shining through and so I firstly, generously applied MAC ‘Warm Soul’ Mineralise Blush, £23 then I applied the teeniest amount of Bobbi Brown ‘Pale Pink’ Blush, £20 which looks the most terrifying shade of Aunt Sal but is, when used correctly the most incredible blue pink that brightens even the dullest of complexions and gives that classic bridal english rose cheek.
I finished my cheeks by bouncing my foundation brush loaded up with MAC ‘Hush’ Cream Colour Base, £19. This cream highlighter is great used last thing to soften any hard edges of bronzer or blush and to give the most beautiful, natural champagne glow.

On to the eyes. The area where I am myself most playful with my make up and the part of my face I like to dial up the most. I am a sucker daily for a bronze, warm eye and while I played with other ideas it is the look I feel most “me” with and the best shades to make my green eyes pop and so on the day I firstly applied Tom Ford Cream Colour For Eyes in ‘Platinum’, £30. This cream pot of deliciousness provides the perfect base of rich, metallic bronze with a subtle cool toned platinum running through it that just bounces off the light and gives this multi-tone effect that is universally flattering.
I then used a few rich, cocoa shades from the NARS ‘Wanted’ Palette to build up darkness in the outer corner.
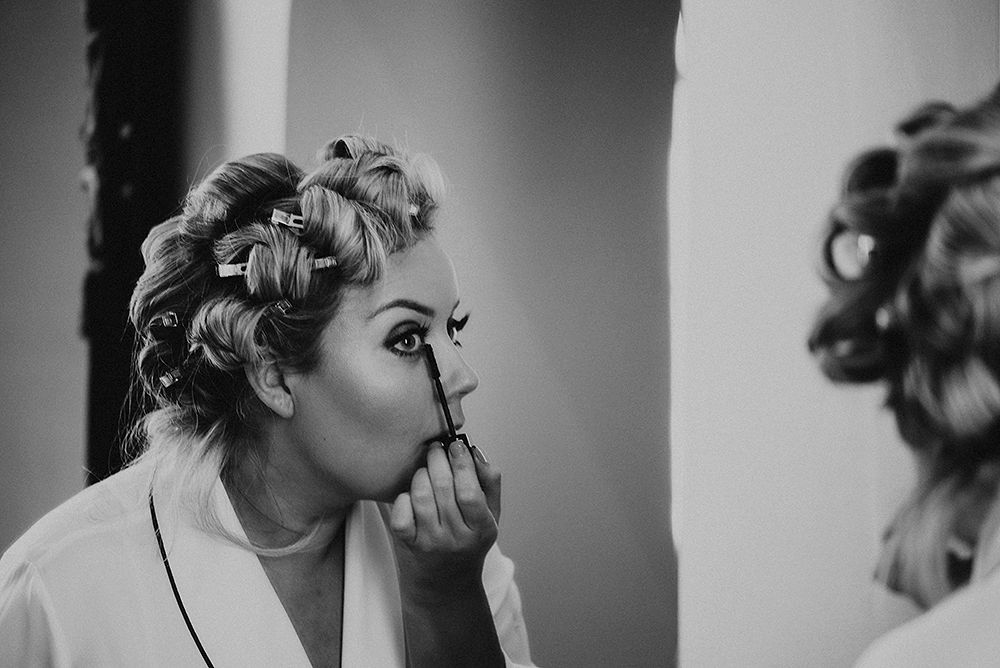
I quickly traced the Tom Ford Eye Defining Pen, £46 along the upper lash line. This dual ended felt pen inspired liquid liner is super easy to apply while instantly giving an intense, black finish. This was applied fairly thickly, especially at the outer corner before I switched to the thinner nib to make a very thin, neat line at the inner corner.
I applied a light coat of the Marc Jacobs Velvet Noir Mascara, £22 mostly to darken my natural lashes before applying the main event, FALSIES! I played around with many lashes during the lead up to the big day and finally settled on the HUDA Beauty ‘Samantha’ Lashes, £16. These lashes provided the perfect amount of glam and flutter while never looking overly false or OTT. I loved them and have managed to get a few more wears out of them since too! Bonus!
Once lashes were applied I buffed a deep plum shade along the lash line to create a buffed, soft focus line pulling this shadow upwards and outwards at the outer corner to create a subtle almond shaped eye. I used what was left on the brush underneath the eye to softly smoke and used a nude eye pencil along the lash line to keep eyes looking bright and reduce redness. Shadow used was Laura Mercier Matte Eye Colour in the shade ‘Black Plum’, £19.50 and the liner used was Charlotte Tilbury Rock ’n’ Kohl Liquid Eyeliner Pencil in ‘Eye Cheat’, £19.00
I had my brows micro bladed by my lovely friend Zara at The White House Clinic in preparation of the wedding day back in July and so on the day they needed little attention, just a small amount of pencil in sparse areas. For this I used the NYX Micro Brow Pencil in ‘Ash Brown’, £9.
Finally I applied my lipstick. My bridesmaids were rocking rich, berry lips and so I opted to keep my lips nude. Nude is also, my safe place and as I am always saying to my brides your wedding day isn’t a day to be experimental. I wore Chanel Rouge Coco Shine ‘Boy’ Lipstick, £31. This lipstick formula is one of my favourites as it has a subtle shine that makes it comfortable and hydrating to wear but is never tacky. This shade is a classic nude with a subtle mauve pink tone mix which I felt gave a gentle nod to all of the colour palettes running through our wedding day. Once the lipstick was applied I slightly tweaked my lip shape using the Charlotte Tilbury Pillow Talk Lip Liner, £16.
Everything was locked into place with a spritz of setting spray in the form of the Urban Decay All Nighter Setting Spray, £24 and I slipped the Charlotte Tilbury Airbrush Flawless Finish Powder, £34 into my bag to take down any shine throughout the day.

Surprisingly unlike my make up, the vision I had for my hair was always set. I KNEW I needed my good friend Fay from Hair Hostess on hand to make all of my hair dreams come true (SPOILER: She did!) and I was certain from day one I wanted to wear my hair down.
…and so it was all fairly simple. I had my trial with Fay back in May and aside from a little bit of homework to get my hair looking tip top for the day she nailed it in one and I couldn’t have been more excited to have it done again on the day.
The brief was a soft Hollywood wave, a style that was very set with lots of volume at the front, pinned flat on one side of the face and with less structured, soft and romantic curls at the back and it was total perfection made only better with the addition of fresh flowers which our florist Lucy Walker (a blog post isn't complete without mentioning her!, if you’ve read my previous posts you’ll know!) which were pinned at the crown of my head and just were the cherry on top of a rather voluminous, curly cake!

So that’s it! The ins and outs of my bridal make up look. I hope it was helpful for any future brides to be currently trying to decide on their bridal make up look or if you’ve simply picked up a few product recommendations to add to your Christmas list!
Thanks for checking in! Want to know what my bridesmaids wore on my big day? If you missed it, it was all in my previous post: The Girls.
Coming up next week- The Boys!
Have a great weekend everyone!
Bryony x
Photography by Katie Ingram. www.katieingram.co.uk
Make up by myself. www.bryonydalton.com
Hair by Fay at Hair Hostess. www.hairhostess.co.uk
